 |
CROSS STITCH
by
cross stitch centre |
 |
The reason for setting up Hints
and Things in the first place was to provide basic information on many
different subjects as I felt this was often overlooked and was extremely
hard to find elsewhere.
When embarking on something
for the first time, whether it be a new hobby, setting-up home, or buying
a secondhand car, you need to know how to get started.
Cross stitch is no exception.
You decide to give it a try so you find a simple kit or a chart - now that
is your first dilemma - what is the difference between a kit and a
chart?
Cross
stitch kits contain everything you need to make the picture or
item in question i.e. fabric, threads, chart and even the needle whereas a
chart just provides the stitching instructions: the fabric, threads
etc., have to be purchased separately.
Right, you have acquired the
kit so you are ready to go - open up the chart and you are faced with
little squares all containing funny little signs or blocks of different
colours - now what do you do? Well help is at hand, the following
explains each step clearly and concisely and even have helpful diagrams
alongside.
CROSS
STITCH INSTRUCTIONS
Some Cross Stitch Guidelines
Cross stitch is fun, and the
range of kits available is now huge. It is best to follow the instructions
in the kit, as the designer will know best how to work it, to do justice
to his or her original concept. It is helpful however to have some general
guidelines on the basics, and that is what we are hoping to provide for
you here.
With stamped cross stitch the
design is printed on the fabric for you to follow. However the vast
majority of cross stitch is "counted" cross stitch. Here the
fabric is blank, and you work the design by following a chart which shows
you where to put the stitches.
The chart is normally divided
up into a grid of squares. Each colour is represented by a symbol, and
there is a "colour key" which shows you which symbol represents
each colour.
Let us assume that the symbol
for black is 'x' and the symbol for green is 'o'. If you see a line of 7
squares on the chart containing the symbols 'xxxxooo', you should make 4
stitches in black and 3 stitches in green.
To Start
It is best to centre the cross
stitch design by starting in the middle so that your stitching fits onto
the piece of fabric without going off to one side. An easy way to do this
is to lightly fold the fabric in four to find the centre point. This point
should coincide with the centre of the chart, which is normally marked
with arrows at the top, bottom and sides. The centre of the design is
normally the best place to start stitching.
Most stranded cotton threads
(floss) are made up of six strands. Separate these out into the correct
number of strands (as indicated on the chart instructions) for stitching.
The colour key shows which shade of cotton to use for each symbol on the
chart.
Start Stitching
To begin the cross stitch,
thread your needle and bring it up through the fabric, leaving a short end
of cotton at the back, and work over this with your first few stitches to
secure it. When there are enough stitches in place you can start off a new
colour by first running it through the back of the existing stitches. To
finish a colour, run your cotton under several stitches at the back to
secure it.
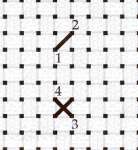 |
Working a single cross stitch
The fabric shown in the diagram on the
left is aida, and it is very popular for cross stitch. This is a block
weave fabric, with a hole at the corners of each block, which is nice
and easy to work. Imagine that each block is represented by one square
on the chart.
To make one cross stitch: bring the needle up through
hole 1, down through hole 2, then up through hole 3, and finally down
through hole 4. |
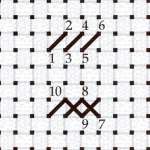
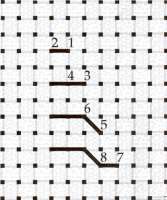
Working a row of cross stitch
To make a row of cross stitches: work
across the fabric in the order shown on the top part of the diagram on
the right, and then back to complete the crosses as shown on the
bottom part. Always cross over in the same direction. It is quicker to
work cross stitches in rows wherever possible.
Try not to join up separate areas of
the same colour with long runs of thread at the back of the work. This
is not only untidy and may show through the fabric at the front, but
will probably mean you will run out of the thread supplied in the
cross stitch kit. It is better to cut and fasten off your thread at
the back of the needle work as normal, and start again at the new area
of the design. |
 |
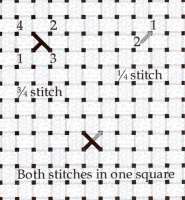
Half Cross Stitch
Many projects now have areas worked
in half cross stitch, for example to give a "soft focus" background.
This stitch is literally half of a cross stitch (up through 1 and down
through 2 etc.), as shown on the top half of the illustration above.
 |
Work a row of Back Stitch
To make a row of back stitches: bring the
needle up at 1, down at 2, up at 3, and down at 4, and so on, as shown
on the diagram on the left. Notice that 1 and 4 use the same hole.
Back stitch is used to great effect on
many designs to delineate and bring out areas of stitching, adding
drama and sharpness to the needle work. It is basically a row of
stitches, marked on the chart by a row of lines. The back stitch is
not normally worked until the cross stitch has been completed.
Back stitch is often worked with just a
single strand of thread. |
Working Part Stitches
It is sometimes necessary to have more
than one colour on a single block of fabric. Imagine a cross stitch
design with a dark grey sloping roof and a blue sky above it. If the
roof slopes from the right up to the left the designer will often make
a part stitch of blue in the top right of the fabric block and a grey
part stitch in the bottom left of the same block.
Where two colours share one square on
the chart, work a 3/4 stitch in the more prominent shade, and complete
the block with a 1/4 stitch of the other shade, as shown in the
diagram on the right. Make your own hole with the needle in the centre
of the block.
The combination of 1/4 stitch and 3/4
stitch often looks better than two 3/4 stitches, where you end up with
a bulky four strands across the middle of a block of fabric.
|
 |
Now you are ready to get started -
but be warned it is addictive! There is nothing like the feeling of
starting with a blank piece of fabric and watching a picture come alive in
front of you. It must be similar for artists and even authors but,
as you have no doubt realised, cross stitch is my particular passion.
Cross
stitch tips and techniques
Copyright © 2000-2020
Hints and Things
All Rights Reserved.
No portion of this site may be reproduced or redistributed without prior
written permission from Hints and Things. All trademarks & copyrights
throughout Hints and Things remain the property of their respective
owners.
Hints and Things cannot be
held responsible for any information given on this site nor do they
necessarily agree with, or endorse, the views given by third parties.
|