 |
CHEAP AND EASY
WAYS TO AMUSE CHILDREN
|
 |
It is always a good idea to have a few odds and ends around
when you have children so, if you have the room, save things like bottle tops, cereal
packets magazines, yoghurt pots, computer printouts, wallpaper offcuts etc. These
can be kept in shoeboxes until required. Other useful items are safety scissors,
non-toxic crayons and felt tip pens (buy safety topped pens with a hole in the lid to
prevent suffocation if sucked into the windpipe), non-toxic paint and glue, masking tape
and old shirts or blouses to use as aprons.
UNDER FIVES
I read your article titled "What
to do with a refrigerator box" and would like to add my 2
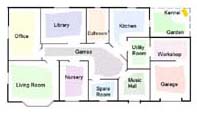
cents...With the help of my 2 girls - ages 2 and 4 - we recently created a
play house out of 4 boxes, with 4 rooms of course.
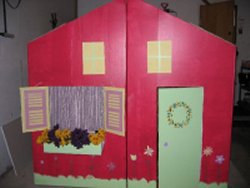 |
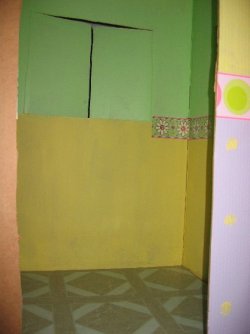
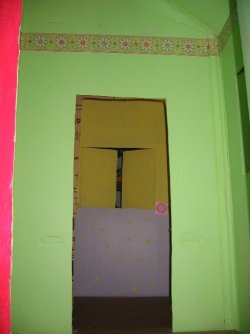
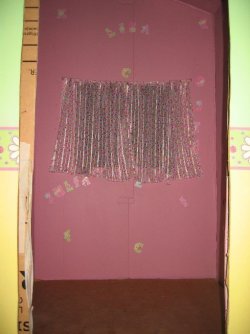
We painted both the inside and
outside. It is complete with doors, windows, room borders, a door bell, a
flower box, working curtains, grass and flowers painted on the outside,
vinyl tiles in one room with the remaining rooms soon to be carpeted!
This
has been a great craft project for the girls...and Mom, too. |
| Most of the
decorative items (vinyl tiles, door bell, borders, wall stickers, artificial
flowers, etc.) came from our local dollar store.
The curtains were made
out of remnants from Joanne Fabrics and the various
colored wall paints were Oops Paints from the Home Depot.
I used old
electrical wire to hang up the curtains and shape the flower box. So
the total cost came to about $20. |
 |
Kindly
contributed by Lesley Tauro
I have yet to come across a child who did not enjoy 'bubbles'.
This recipe is a bit different to one I used to use, it has
been sent in by Ruth Ann and has been consumer tested by her granddaughter, Ashley!
RECIPE
Combine the following ingredients -
1/3 cup
dish soap (Joy, Palmolive, Fairy, baby shampoo etc.)
1.1/4 cups of water
2 teaspoons sugar (to help
bubbles hold together)
You can also add a drop of food colouring
for pretty bubbles!
Get the child to lie down on its back on a sheet of wallpaper or lining
paper (which is very reasonable to buy). Draw around the child's shape, then help
paint it in.
Draw the outline of a familiar object, then show the child how to dip
its fingers into the paint and dab colour inside the shape. Small pieces of sponge
can also be used instead of their fingers. As with all painting make sure furniture
and floors are well protected.
Use masking tape to stick a doily onto a piece of paper. Let the
child paint over it and then remove to reveal the pattern underneath.
Get the child to draw a picture with WHITE crayon on a white sheet of
paper, the paint over the whole page. The original painting will appear as if
by magic.
Make some modelling clay, which can be used by all ages, by mixing
together four cups of flour with one cup of table salt, add while stirring approximately 1
1/2 cups of water and 1 tablespoon of cooking oil (for smoothness). Do not add all
the water at once as different flours take different amounts. Knead well before
using. Another recipe for dough is 750 g flour with 400ml of water and a little food
colouring. Both recipes should keep for a week in an airtight container in the fridge.
If they become sticky add a little flour.
Cut vegetables, such as potatoes, in half and then make a simple shape
in the cut surface e.g. star, dip into paint and push down on some paper to print out a
pattern. Leaves, scrunched up paper and small pieces of sponge can also be used to
make different types of patterns.
Find a rounded stone - ensure it is too big to be swallowed - help your
child to draw or stick on eyes, nose and tail to make a mouse paperweight.
Use old gloves, mittens and socks to make glove puppets. Stick on pieces
of felt or scraps of material to make eyes, ears etc.
Fold a piece of paper vertically in half, unfold, then get the child to
paint on one side of the fold. Fold the paper back down the same fold pushing down
hard on the painted side. Open up to reveal the mirror image of the painting.
Copyright © 2000-2020
Hints and Things
All Rights Reserved.
No portion of this site may be reproduced or redistributed without prior
written permission from Hints and Things. All trademarks & copyrights
throughout Hints and Things remain the property of their respective
owners.
Hints and Things cannot be
held responsible for any information given on this site nor do they
necessarily agree with, or endorse, the views given by third parties.
|